1809 Campaign
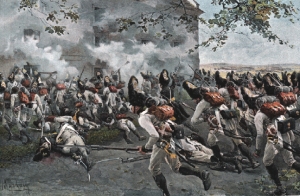
Austrian "German" Grenadiers storming the granary at Essling, 1809. Graphic provided by John Schneider, Napoleonic Literature.
Introduction
The 1809 Campaign was, militarily, only a marginal victory for Napoleon. Austrian troops under Archduke Charles acquitted themselves extremely well on the fields of Aspern-Essling and Wagram. Napoleon's narrow victory at Wagram would be his last. Even then, it was not satisfying. Napoleon was quoted after Wagram saying: "War was never like this, neither guns nor prisoners. This day will have no result." In fact, the French sufferred more casualties and lost more Eagles at Wagram than the Austrians.
Preparations for War
French reversals in the Peninsular, British urging, and the desire to revenge the humiliating defeat at Austerlitz led the Austrians to begin preparations for war. The target date - Spring 1809. Napoleon, having caught wind of Austrian preparations, secured a promise for Russian intervention on the French side in case of war with Austria. Satisfied with Russian assurances, Napoleon transferred 200,000 troops from Germany to Spain in Autumn 1808 to deal personally with the Spanish problem. But news of court intrigues caused Napoleon to rush back to Paris in January 1809. In Paris, Napoleon learnt not only of court intrigues, but also received confirmation that the Austrians were seriously mobilising their forces for war. Austrian plans called for an invasion of Bavaria, with secondary operations in Poland and Northern Italy.
The Imperial Guard was recalled from Spain and orders were sent out for French forces to concentrate at Ratisbon, Germany. On 10 April 1809, Austrian forces - 6 Corps strong - crossed into Bavaria. The war had begun.
Austrian Invasion of Bavaria
The Austrian attack on Bavaria was a pincer movement. I and II Korps crossed into Bavaria north of the Danube. III, IV, V, VI and 2 Reserve Korps entered Bavaria between Passau and Braunau.
Davout, with III Corps positioned around Regensburg, was caught in the middle of the pincer. When Charles learnt of this, he ordered III and IV Korps to close the pincer around Davout. II Reserve Korps and V Korps were ordered to move to the Abens river in order to protect the left flank of III and IV Korps. VI Korps was ordered to secure the entire army's left flank.
Davout was ordered to retire from his threatened position at Regensburg. After an engagement at Teugen and Hausen with elements of Austrian III and IV Korps, Davout broke through the jaws of the pincer. Napoleon then ordered the Bavarians, Wuerttembergers and a provisional French Corps under Marshal Lannes to attack the Austrians across the River Abens. The Austrian V Korps was pushed back to Landshut.
Napoleon then realised that the Austrian main force was pursuing Davout in the north. He turned his troops facing the Austrian V Korps and marched north. This ended in the Austrian defeat at Eckmühl on 22 April. The Austrians retreated into Bohemia. Defeated, the Austrian army was unable to prevent Napoleon from pushing on and capturing Vienna on 13 May 1809. However, this was a hollow victory. Napoleon still had to deal with the Austrian army - 100,000 strong - still hovering somewhere to the north of Vienna.
Aspern-Essling, 21-22 May 1809
Although his troops numbered only 80,000, Napoleon was impatient and wanted to inflict a quick defeat on Austria. The memories of Austerlitz were reinforced by the Austrian reversals earlier in Bavaria. A decision was made to cross the swollen Danube to the Lobau island and then on to Mühlau. French troops began crossing to Lobau island on 19 May 1809. By 21 May, French forces were positioned between the villages of Aspern and Essling - a front approx 2 km in length.
Charles had decided to let the French cross the Danube in order to defeat it in the field. If defeated, the French army with the river to its back, would be easily destroyed. In accordance with this plan, Austrian forces were arrayed in a semicircle around the French.
The Austrian assault - 3 Korps strong - began on the morning of 21 May, with the main thrust on its right flank - against the village of Aspern. At this point, the French only had 3 infantry divisions and several cavalry brigades and the bridge across the Danube was broken. The French position looked perilous but was strongly anchored on the 2 villages of Aspern and Essling - with the cavalry covering the centre.
The initial Austrian attacks on Aspern were hasty and uncoordinated and made little headway against the French. However, by late afternoon, repeated assaults and the weight of Austrian numbers were beginning to tell. Personal intervention by Charles inspired the Austrian troops to make a final all out assault, and Aspern was taken at 6.30pm. Fresh French troops were ordered to retake Aspern and by nightfall, neither side could claim full control of the ruined village.
While the battle raged on in Aspern, French cavalry charged the Austrian centre in an attempt to relieve the pressure on the embattled village. These charges were easily repulsed by Austrian infantry deployed in battalion masses - muskets bristling on all sides.
Austrian troops also made several assaults on Essling. These were largely uncoordinated and failed to make headway - particularly against the massive stone granary.
French reinforcements crossed the Danube during the night and were available for action the next day. Napoleon planned a massive assault against the Austrian centre. To prepare for this, he ordered the immediate recapture of Aspern - in order to secure his left flank. At the same time, Austrian assaults on Essling were repulsed. By 7.00am, both Napoleon's flanks were secure and his move against the Austrian centre could proceed.
The French assault would be by 3 divisions supported by cavalry and artillery under Lannes' command. In the face of this and several French cavalry charges, the Austrian line began to waver. But Charles' presence and personal intervention kept the line steady. In the meantime, Austrian artillery rained death and destruction on Lannes assault columns. Taking heavy casualties - and without reserves - the French were forced to retire. Napoleon's gamble had failed.
Meanwhile, Austrian assaults on Aspern and Essling continued unabated. By 3pm, both villages were taken and preparations were made for a massive thrust against the French centre. A grand battery of 200 guns was positioned along the front centre of the Austrian army and began bombarding the French centre. In a desperate attempt to stave off defeat, Napoleon launched his cavalry against the Austrian centre. Under cover of this charge, French troops began a disordered retreat across the Danube.
Although he would later claim a victory, Napoleon had sufferred his first major defeat. However, his army was still intact and more troops were on the way from Germany. By early July, Napoleon had assembled an army twice as strong - 190,000 men. The Austrians could only field 137,000 men and Charles was urging his brother, the Archduke John, to hurry back with his 2 corps of troops in Northern Italy: "The battle here on the Marchfeld will determine the fate of our Dynasty."
Wagram, 5-6 July 1809
Napoleon had learnt his lesson. The next crossing was well-planned. First, a deception that he intended to cross again at Mühlau. Then, well constructed bridges were placed across the Danube to the east, near Gross-Enzersdorf.
The main Austrian force was concentrated on a height known as the Wagram. Here were massed 2 Austrian corps. 3 corps covered the right flank, and 1 corps on the right. The entire front stretched some 20km. In addition, 2 corps were assigned to fight a delaying action between the Danube and the main Austrian position.
By 6pm on 5 July, the French were in position facing the Austrians. Instead of waiting, Napoleon issued orders for an immediate assault by 4 corps on the main Austrian position on the Wagram. The assault began at 7pm heralded by a massive artillery bombardment. A desperate struggle for possession of the Wagram began. Under heavy assault, it looked as if the Austrian I Korps holding the right of the Wagram would break. Once more, Charles' personal efforts steadied the line and led the Austrian counterattack against the exhausted French. The crisis was over, the French retreated back to their start line.
On 6 July, the French plan was to launch a pinning attack against the Austrian centre and outflank their left. On the other hand, Charles realised the weakness of the French left. The main Austrian attack would go in against the French left in an attempt to cut them off from the Danube and then take the French army in the rear.
The day began with an Austrian advance on the French left by IV Korps. However, the failure of III and VI Korps to show up at their start line on time led Charles to order IV Korps back to the start line. This caused Napoleon some concern as it was thought that Archduke John had finally shown up with his 30,000 men. The failure of III and VI Korps to show up on time had compromised the Austrian plan and lost them the element of surprise.
Meantime, I Korps was ordered to advance against the French in order to pin down their left flank. The unsanctioned abandonment of the village of Aderklaa by Bernadotte made the Austrian advance plain sailing. Napoleon was furious and ordered Massena to retake Aderklaa at all costs - but to no avail.
The Austrian VI Korps was now on its way against the French rear. Napoleon was concerned as this position was weakly held by 1 French division. Notwithstanding that VI Korps broke through the French left rear, lack of initiative of the commander on the ground prevented the success from being exploited. Instead of advancing against Napoleon's rear, VI Korps sat down to wait for III Korps to come up to its position. Napoleon immediately ordered a cavalry charge and artillery bombardment against the Austrian line in order to cover Massena's move south to meet the threat posed by VI Korps.
Napoleon then launched Davout against the Austrian left flank.
Notwithstanding a massive artillery bombardment followed by desperate infantry and cavalry battles, the French were unable to break the Austrians.
In a final desperate move to break the Austrians, Napoleon ordered a general assault all along the line. Macdonald, commanding the French centre, formed a massive square of 30 battalions to advance against the Austrian centre. The Austrians poured all their fire into this lumbering square causing massive casualties. Within an hour, out of 8,000 men who began the advance, only 1,500 remained standing.
However, French attacks on both flanks were gaining some measure of success and the Austrian troops on the Wagram were already exhausted after a whole day of almost continuous fighting. Furthermore, there was no sight of Archduke John's 2 corps. Anxious to save his army, Charles issued orders for a phased withdrawal. This was carried out in good order.
Aftermath
After several rearguard actions, a ceasefire was agreed on 11 July. The defeat caused Charles to resign his command in bitterness. An armistice was signed in October. Austria lost much territory and had its army limited to 150,000 men. Although Austria had been defeated, Napoleon henceforth would show great respect for the fighting qualities of the Austrian soldier.
. . . . .
Sources:
Ian Castle, Aspern and Wagram 1809 (Osprey Campaign Series) - good maps and orders of battle - Highly recommended further reading.
Gunther Rothenberg, Napoleon's Great Adversary.
Georges Blond, La Grande Armee
[an error occurred while processing this directive]